3D Print Ironing Settings for Perfect Smooth Top Layers
If you’ve been 3D printing for a while, you know the joy of peeling a clean part off the bed. But you also know the frustration when that top layer just doesn’t look right. Instead of a smooth finish, you’re left with visible lines or tiny gaps that make the print look unfinished.
Now picture this: you print a simple square, lift it up, and the top is so smooth it looks like it came straight out of a factory mold. No sanding, no filler, no post-processing. Just perfect, right off the printer.
That’s exactly what makers are getting by tweaking a little-used slicer feature called ironing. And thanks to a recent tip shared on Reddit, there’s now a recipe that delivers silky-smooth results nearly every time.
What Is Ironing in 3D Printing?
Ironing is a setting in most slicers, like Cura and PrusaSlicer, that smooths the top surface of your print. After the last solid layer, the nozzle passes back over the surface while extruding a very small amount of filament.
Think of it like ironing clothes. The nozzle presses material flat, fills in gaps, and leaves behind a polished finish. The problem is, default settings rarely give you the best results. That’s where the community steps in.
The “Perfect Every Time” Settings
Here’s the configuration shared by a Reddit user that has been getting incredible feedback:
- Nozzle size: 0.4 mm
- Layer height: 0.2 mm
- Ironing direction: 45°
- Ironing spacing: 0.15 mm
- Ironing speed: 60 mm/s
- Ironing flow: 30%
- Ironing inset: 0.21 mm
With this setup, the top surface ends up looking almost identical to an injection-molded part. One user summed it up perfectly: “It feels like a matte injection molded piece.”
Why These Settings Work
Each of these parameters plays a role. Setting the ironing direction to 45 degrees helps prevent streaks, while the tight spacing of 0.15 mm avoids leaving little gaps. A moderate speed of 60 mm/s keeps the motion fast enough to level the material without building up excess heat. Flow at 30 percent ensures just the right amount of filament is added to smooth the surface without blobs. Finally, the inset pulls the path slightly inward, preventing rough edges.
Together, these adjustments create a polishing pass that leaves your part with an impressively uniform top layer.
When to Use Ironing
Ironing isn’t necessary for every print. It adds time to the job, so it’s best reserved for parts where surface finish really matters. If you’re printing display models, casings, or anything with a big, flat top surface, it’s a fantastic option. It also shines on prototypes where you want to show off a professional finish.
On prints with lots of curves or textured details, the difference may be less noticeable.
Things to Keep in Mind
While ironing can make a huge difference, it isn’t flawless. Expect longer print times when it’s enabled. Watch out for overheating, since too much nozzle heat can smear instead of smooth. And remember that different materials behave differently. PLA usually works best, while flexible filaments may give you unpredictable results.
The surface appearance also depends on your preference. Some people love the glossy, injection-mold look, while others prefer a more matte finish.
Seeing the Difference
Take a look at the comparison below. The left shows a standard top surface, while the right uses ironing with the recommended settings.
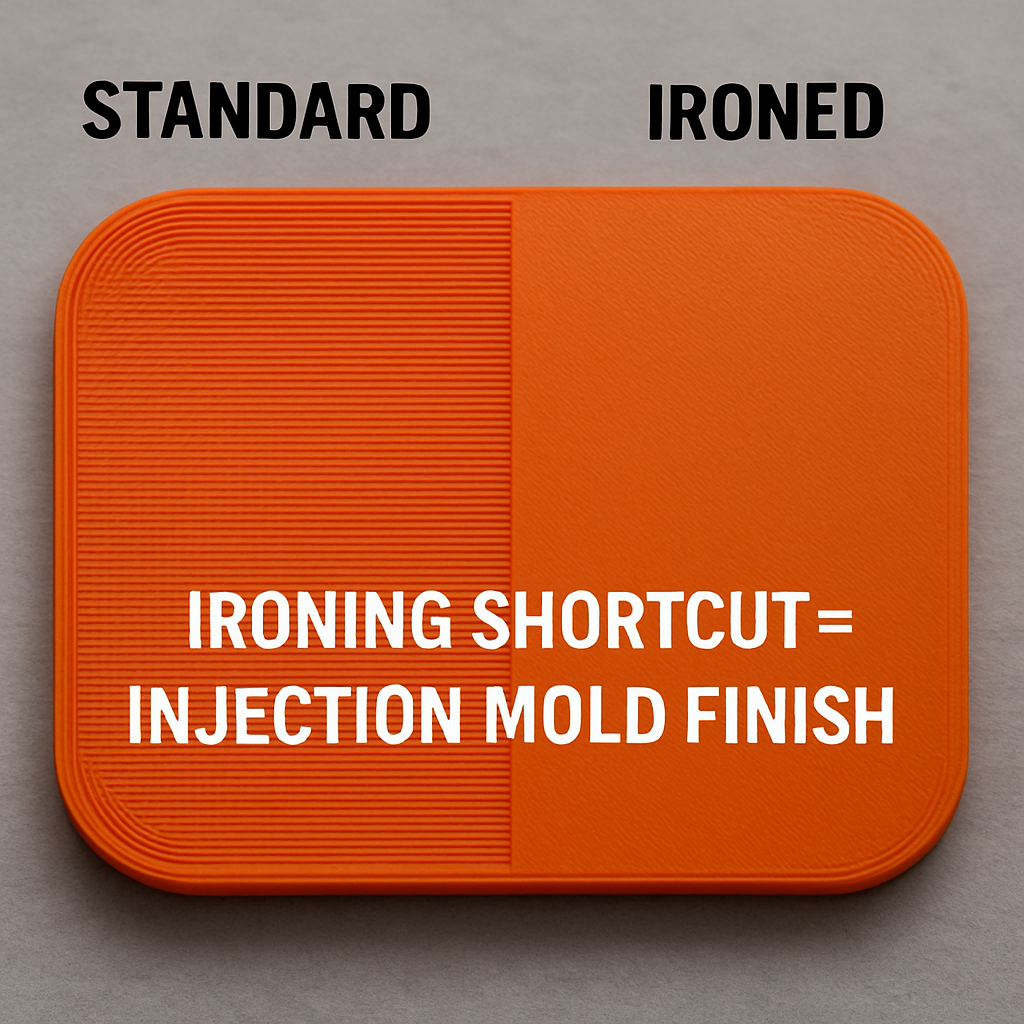
It’s easy to see why this technique has been getting so much attention. The ironed side looks clean, professional, and ready for use straight out of the printer.
Final Thoughts
Ironing is one of those slicer features that often gets overlooked, but when tuned correctly it can transform your prints. Instead of settling for rough top layers, a few parameter changes can give you parts that feel like they came out of an injection mold.
If you’ve ever been disappointed by the finish of your prints, give these settings a try. It only takes a minute to enable ironing, and the results might surprise you.
This page contains affiliate links and I earn a commission if you make a purchase through one of the links, at no cost to you. As an Amazon Associate I earn from qualifying purchases.